Do you know about the basic principles of measurements? In this article, you can quickly learn about the manual taking-off procedure. Firstly, we need some dimensions papers, also called taking off sheets (TDS) for the purpose of taking off.
Dimensions Paper and Measurement Principles
BS 3327:1970, ‘Specification for Stationery for Quantity Surveying’ defines the paper size for Dimension Papers. The standard sheet is A4 (210 mm X 297 mm) ruled vertically as per the following figures. Figures 1 & 2 show the width of the columns & the purpose of columns on the face and reverse sides of the dimension paper.


Each dimension sheet is divided into two parts, both of which have the same ruled layout and consist of four columns each. The binding margin for binding the dimension papers is the first column of the face side, which is 9 mm wide, and the last column of the reverse side. The following provides an explanation of the goals behind each column.
- Column No. 1 – When measuring multiple instances of a specific item, the Timesing column is used to multiply.
- Column No. 2- In the Dimension column, you can enter the actual or scaled dimensions that were taken from the Drawings. Depending on whether it is linear, square, or cubic, an object may have one, two, or three measurement lines.
- Column No. 3 – When we multiply the numbers in columns 1 and 2 together, the results are recorded in the Squaring column. This allows us to obtain the length, area, or volume. After that, it is transcribed onto an abstract sheet or a BOQ.
- Column No. 4 – The Description column is where you should write the descriptions for each item, as well as any preliminary calculations, other information, and references.
Form of Dimensions
Five types of dimensions in the principles of measurements are exits and those are listed below.
- Linear measurement
- Square measurement
- Cubic measurements
- Numbers
- Items
Dimensional Sequence in Measurement Principles
When entering dimensions, the dimensions shall be written in a fixed order in the column. Usually, the below sequence follows.
- First of all, you should enter the horizontal length.
- Secondly, you should enter the horizontal width
- Finally, you should enter the vertical depth or height.
Calculations will not be impacted in any way by the sequence; however, it will be of great assistance when finding measurements in the future. The wrong order of a description can sometimes mislead an estimator in pricing. Therefore, quantity surveyors should be concerned about the order of dimensions of the principles of measurements.
The writing style of Measurements
Once the measurements are arranged so that they are immediately below one another in the Dimensions column, the space between each individual item is denoted by a line.

An item to be enumerated is typically indicated in one of the below manners in principles of measurements.

In some cases, the Standard method of measurement (SMM) calls for the insertion of an item. This item is a description that does not include a quantity that is being measured, and it is denoted as follows.

It is not necessary to label the dimensions as linear, square, or cube. As there is a rule that states one must always draw a line under each measurement. The category under which it falls is clear from the number of entries in the measurement.
Timesing
When QS is writing a dimension, he will occasionally notice that several similar items have the same dimensions. This is an indication that the dimensions should be multiplied, or “timesed”:

The “timesing” number is in the first column and is diagonal across from the “dimensions.” A “timesing” item can be “timesed” again, with each multiplier adding everything to its right, as follows:

Dotting On
When a measurement is repeated, QS recognises that this dimension cannot be multiplied but must instead be added. When additional things happen, the dimensions can be expanded by “dotting on” or by adding:

Measurement Principles of Irregular Figures
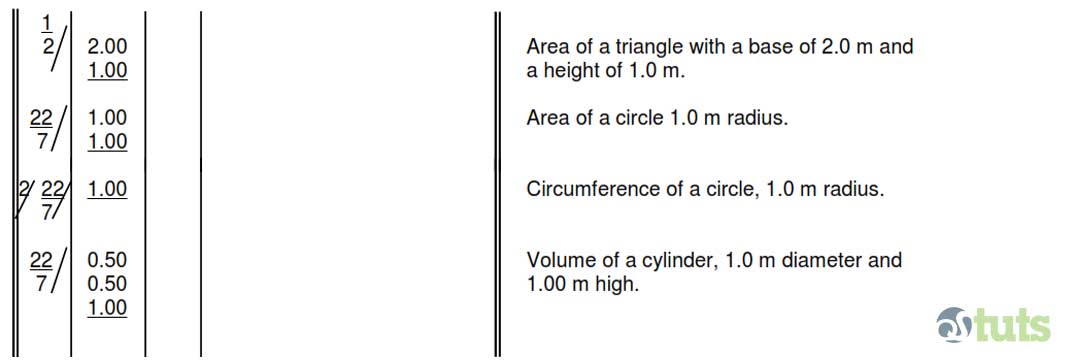
There are times when it is necessary to measure the areas of triangles and circles, as well as the circumferences of circles and the volumes of cylinders. The following are the general measurement principles for inserting the dimensions.

Brackets
When a description or group of descriptions contains more than one measurement, brackets are used to separate the measurements. Out of the squaring column, we place the brackets. The top and bottom of the brackets are indicated by a vertical line with cross marks. All of the measurements that are denoted by brackets have been matched up with the appropriate descriptive words on the abstract sheet.
Correcting the wrong measurements
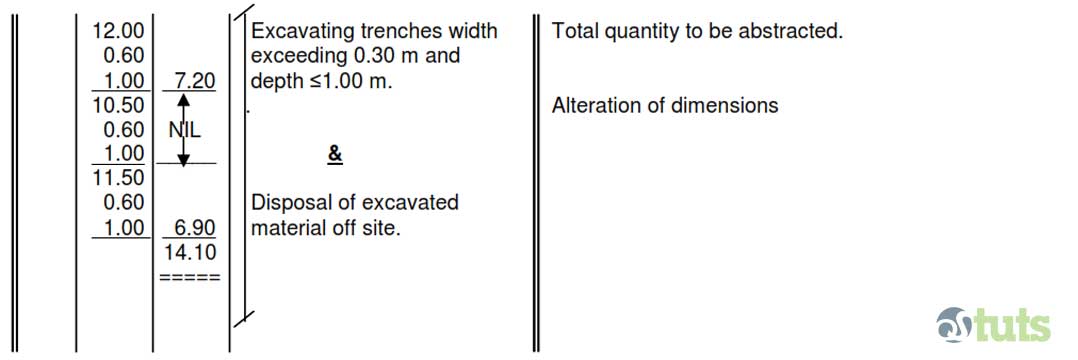
Measurements that have been recorded incorrectly cannot be changed or erased. The proper method for cancelling out erroneous dimensions is to write “NIL” in the squaring column close to the inaccurate measurements and indicate the extent of the cancellation with brackets and arrowheads. The appropriate measurements must then be expressed in the dimension column as follows:

Waste / Preliminary Calculations
Dimensions must not be calculated mentally, with the exception of very straightforward situations. Not only will writing down the calculations reduce the likelihood of making an error, but it will also make it easier for another person to identify the point of reference for the measurements when they are validated. The preliminary or waste calculations used to determine the dimensions, as well as any related explanatory comments, must be clearly written in the description column’s right-hand side.
The possibility of making an error will consequently be reduced as a result of the fact that these calculations can be double-checked during the working-up process. In addition, the method that was utilised to determine the dimensions will be illustrated in detail for future reference.
Before transferring the results of the waste calculations to the dimension column, the results are rounded to the nearest ten millimeters (5mm and above 5mm are counted as 10 mm and anything below 5mm is ignored).
Why do we put space between each measurement?
There should be adequate space between each measurement and detail. This makes it abundantly clear where it begins and where it concludes. Then, if you take a measurement and realise that you forgot to include something, it is simple to add it where it belongs.
The Description
The description shall be adequate, clear and concise, in accordance with the supplementary rules set out in the Standard method of measurement (SMM).
Anding On (&) / Ampersand sign
The use of the ampersand sign (&) denotes that the dimensions are to be repeated for other items; this prevents the repetition of measurements. However, one must exercise caution when combining linear and square measurements or square and cubic measurements.
Deductions in Measurement Principles
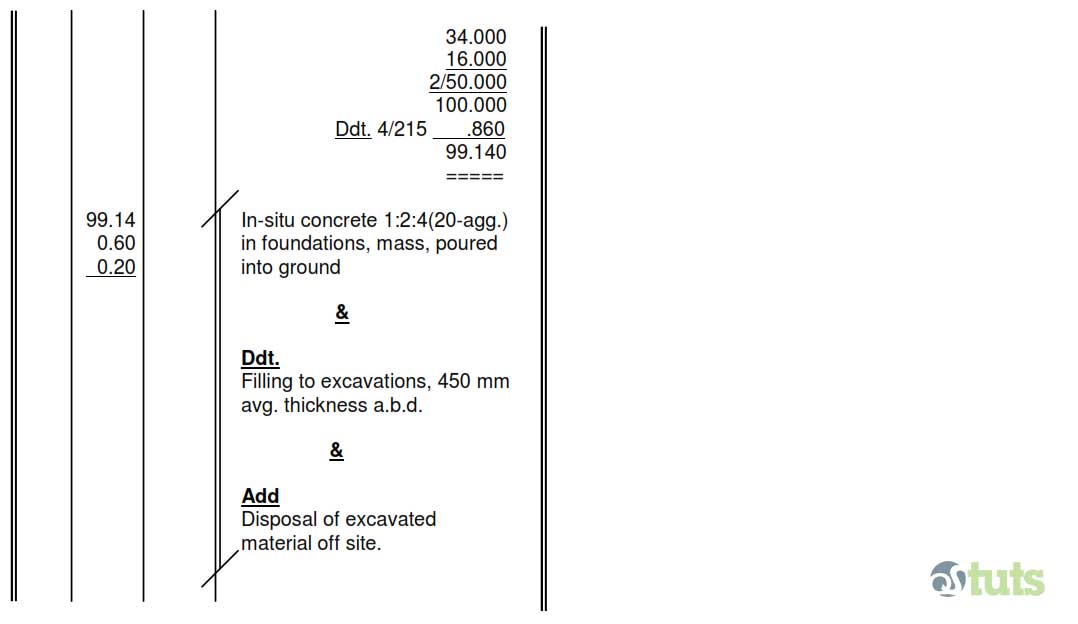
Measurements must always be taken “working from whole to part,” which means that they must be taken overall and then any necessary deductions made. In the description column, deductions are made from previously measured quantities, as can be seen in the following example.
The item must be prefixed with the term “Ddt” before any deductions are made. If there are any additions made after that, the word “Add” should be written before the item. This will ensure that only the required items are correctly subtracted from the total.

Headings of Dimension paper
Headings are necessary when taking off so that the dimension papers/measurement sheets shall be associated with a specific project/contract and also to identify the order of measurements for later reference.
Before writing the taking-off list, the title of the project, the referred drawing numbers, the name of the person doing the taking-off, and the date of the taking-off are written on the upper edge of the dimension paper in accordance with the principles of measurements. In contracts that have several buildings, the title of each building unit should be included in the appropriate dimension sheet.
Column / Page Numbering
Each dimension’s column must be identified by a number that appears in order at the bottom of the column. For future reference, this is helpful. Additionally, it offers a more thorough check, which makes sure that all of the dimensions are included.
What is the meaning of extra over item?
Some such items are measured as extra over-the-work items wherein they actually happen. In this case, the QS will value the extra cost involved because this item will have been measured before to some level. Bends for rainwater pipes (extra over for pipes), and extra over for rock excavation when excavating the soil are examples of this type of item.
Symbols and Abbreviations
In order to save space and time when entering items, many of the words entered in the description column are shortened. Many abbreviations have almost become standard and can be used anywhere.


1 thought on “QS Guide For The Principles of Measurements : Taking off Quantities”